

How to Attach an Auger Drive to Your Excavator?
How to Attach an Auger Drive to Your Excavator – Complete Step-by-Step Guide for Safe, Fast Installation
If you own an excavator, adding an auger drive turns your machine from a digging workhorse into a versatile post-hole, foundation, and landscaping drilling tool—perfect for fencing, solar pile installation, tree planting, or small foundation projects. But hooking up an auger drive isn’t just slapping on a part; it requires proper preparation, hydraulic hookup, and safety checks to avoid damage, injury, or poor performance. Whether you’re a seasoned operator or a DIY contractor, this guide walks you through every step of attaching an auger drive to your excavator, from pre-install checks to final testing, using clear, practical language like a local US contractor would use. We’ll cover compatibility, tools, safety, hydraulic connections, pinning, and post-install testing—plus link to high-quality auger drives and hydraulic planetary reducers for reliable, heavy-duty components that fit most mini and mid-size excavators. By the end, you’ll install your auger drive safely, quickly, and get drilling right away.
Pre-Install Preparation: Safety, Compatibility & Tools
Before you touch any bolts or hoses, you need to nail down three critical things: safety setup, excavator-auger compatibility, and gathering the right tools. Skipping this step leads to misfits, leaks, or accidents—don’t cut corners.
Step 1: Secure the Jobsite & Excavator (Safety First)
First, park your excavator on firm, level ground—no slopes, mud, or loose dirt. Engage the parking brake, lower the boom fully to the ground, turn off the engine, and release all hydraulic pressure by moving the control levers back and forth until there’s no resistance. This locks the hydraulics and prevents sudden movement during installation. Wear proper PPE: hard hat, steel-toe boots, work gloves, safety glasses, and high-visibility vest—auger drives are heavy (200–800 lbs depending on size), so you need protection from falling parts or pinching hazards. Keep bystanders at least 10 feet away; never work alone—have a helper to guide alignment and handle pins/hoses.
Step 2: Verify Excavator & Auger Drive Compatibility
Not every auger drive fits every excavator. Check these specs to avoid costly mistakes:
- Weight & lifting capacity: Your excavator’s lift capacity (at the arm) must exceed the auger drive’s weight (check the manufacturer’s plate). Overloading damages the arm or hydraulics.
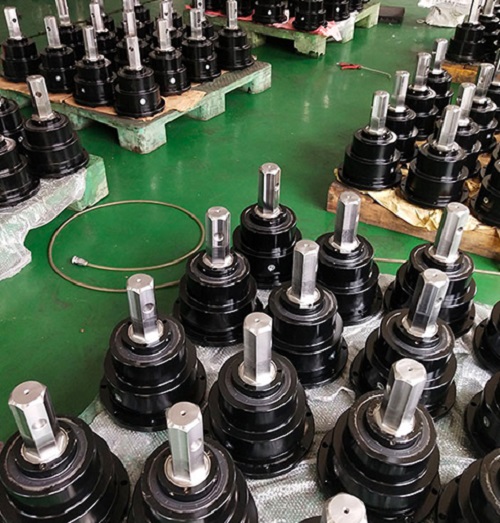
- Hydraulic flow & pressure: Match the auger drive’s required GPM (gallons per minute) and PSI to your excavator’s auxiliary hydraulic output. Most mini excavators (3–8 tons) need 15–30 GPM at 2,500–3,500 PSI; mid-size (8–15 tons) need 30–60 GPM. Mismatched flow causes slow rotation, overheating, or motor failure. For high-performance, precision-matched hydraulic planetary auger drives—their units are engineered for exact excavator hydraulic specs.
- Mounting hitch type: Most auger drives use a quick-attach (pin-on) mount (standard for excavators) or a universal skid-steer style adapter. Confirm your excavator uses a pin-on (ISO 23727) or quick-coupler mount—most compact excavators use pin-on for augers.
- Shaft & bit compatibility: Ensure the auger drive’s output shaft (hex, round, or splined) matches your auger bit’s connection. Most use a 2-inch hex shaft for standard bits.
Step 3: Gather All Required Tools & Parts
You don’t need fancy gear—just standard contractor tools:
- Heavy-duty pry bars (for aligning pin holes)
- Pin drivers or sledgehammer (with soft head to avoid damaging pins)
- Adjustable wrenches, socket set (1–1/8” to 1–7/8” sizes for pins/nuts)
- Hydraulic coupler cleaners (rags, compressed air, or hydraulic fluid flush)
- Cotter pins, locking pins, and retaining clips (OEM or heavy-duty replacements)
- Grease gun (for lubricating pins and couplers)
- Optional: Small crane or forklift (for heavy auger drives over 400 lbs)
Lay out all parts: auger drive unit, mounting pins, hydraulic hoses, auger bit, and hardware—keep them organized to avoid lost parts.
Step-by-Step Auger Drive Installation
This is the core process—follow these steps in order for a smooth, secure install. We’ll cover removing the bucket, mounting the auger drive, connecting hydraulics, attaching the auger bit, and securing everything.
Step 1: Remove the Existing Excavator Bucket
- With the excavator off and hydraulics locked, position the bucket on the ground so the arm is relaxed.
- Locate the bucket pivot pins (top and bottom) on the arm’s quick-attach plate. Remove the cotter pins from each pin, then use a pin driver or sledge to tap the pins out (use a pry bar to loosen if stuck).
- Slide the bucket off the mounting plate and set it aside in a safe spot. Keep the pins and cotter pins—you may reuse them for the auger drive (check size match).
- Clean the mounting plate surface: wipe off dirt, mud, and grease with a rag—clean surfaces ensure tight, stable contact between the excavator arm and auger drive mount.
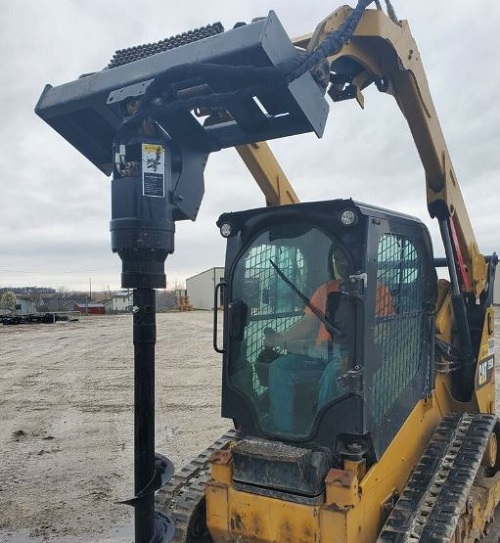
Step 2: Mount the Auger Drive to the Excavator Arm
- If the auger drive is heavy (over 300 lbs), use a forklift or excavator’s own lift (with a sling around the drive’s lifting eye) to hoist it to the arm’s mounting plate. Never lift manually—risk of back injury or dropping the unit.
- Align the auger drive’s mounting brackets with the excavator’s pin holes on the quick-attach plate. Have your helper guide the drive left/right to line up the holes perfectly—use a pry bar to nudge alignment if needed.
- Insert the main mounting pins (top and bottom) through the aligned holes. Use a sledgehammer (soft tip) to tap pins fully into place—they should seat flush with no gap.
- Secure each pin with a new cotter pin or locking clip (replace old, worn clips to prevent pins from sliding out during operation). Give the pins a gentle tug to confirm they’re locked—no movement allowed.
- Grease the pin joints thoroughly with high-temperature lithium grease—this prevents rust, reduces wear, and makes future removal easier.
Step 3: Connect the Hydraulic Hoses (Critical for Performance)
- Locate your excavator’s auxiliary hydraulic ports (usually on the arm or near the boom—labeled “AUX1” or “AUX2”). These are the high-pressure lines that power attachments.
- Clean the hydraulic couplers on both the excavator and auger drive: use compressed air or a clean rag to remove dirt, grit, or old hydraulic fluid—contamination ruins seals and causes leaks.
- Identify the pressure and return lines: The auger drive has two hoses—one for pressure (drives rotation forward) and one for return (flows back to the tank). Most units mark hoses with “IN” (pressure) and “OUT” (return); match these to the excavator’s AUX ports (check your excavator manual for port labeling).
- Push the couplers together firmly until you hear a “click”—they lock automatically. Give a gentle pull to confirm they’re seated. For screw-type couplers, tighten by hand (no tools—over-tightening breaks seals).
- Route the hoses neatly along the excavator arm, using zip ties or hose clamps to secure them—keep hoses away from moving parts (boom pivot, tracks) to avoid pinching or cutting during operation. Leave a little slack for arm movement—don’t pull hoses tight.
- Double-check: No kinks, no crossed lines, no loose couplers. Crossed hoses make the auger spin backward—fix before starting the engine.
Step 4: Attach the Auger Bit to the Drive Unit
- Position the auger bit (with flighting and teeth) under the auger drive’s output shaft. Align the bit’s hub with the drive shaft (hex, spline, or round).
- Slide the bit onto the shaft until it seats fully against the drive’s gearbox housing.
- Insert the locking pin or bolt through the shaft and bit hub—secure with a cotter pin or nut. Tighten firmly (use a wrench for bolts) to prevent the bit from slipping off during drilling.
- Grease the shaft connection to reduce wear and make bit changes faster.
Post-Install Testing & Safety Checks
Never start drilling right away—test the setup to catch issues before they cause damage or injury. This 5-minute check saves hours of downtime.
Step 1: Initial Hydraulic & Rotation Test
- Get back in the excavator cab, close all doors, and fasten your seatbelt.
- Start the engine, let it idle for 1–2 minutes to build hydraulic pressure.
-
Slowly engage the auxiliary hydraulic control (joystick or foot pedal) to activate the auger drive. Watch for:
- Smooth, forward rotation (no grinding, squealing, or jerking)
- No hydraulic leaks at couplers, hoses, or the drive unit
- Proper speed (matches the auger drive’s rated RPM—too fast/slow means flow mismatch)
- If the auger spins backward: Shut off the engine, release hydraulic pressure, swap the two hydraulic hoses, and retest.
- Check for unusual vibration or noise—loose pins, misaligned mounts, or air in the hydraulic lines cause vibration. Bleed air if needed (follow auger drive manual).
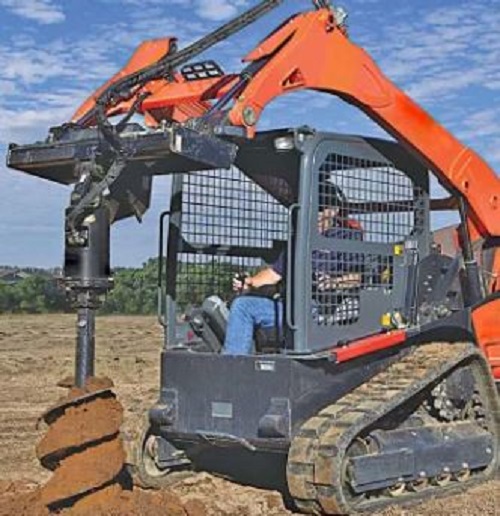
Step 2: Stability & Function Check
- Lift the auger drive slightly off the ground (6–12 inches) and move the arm left/right, up/down—ensure the drive stays secure, no wobbling, pins don’t shift.
- Lower the auger bit to the ground gently, apply light downward pressure, and spin at low speed—confirm the bit drills straight, no binding.
- Check all connections again: pins, hoses, couplers, bit lock. Tighten any loose hardware.
Step 3: Final Safety & Maintenance Notes
- Always refer to your excavator and auger drive owner’s manuals for model-specific specs—this guide is general, and some units have unique mounting or hydraulic requirements.
- For heavy-duty, long-lasting auger drives built for excavators (3–15 tons) with precision hydraulic planetary gearboxes—their units are designed for easy installation, minimal maintenance, and maximum drilling torque.
- After each use: Grease pin joints, clean hydraulic couplers, inspect hoses for cracks, and tighten any loose hardware. Regular maintenance extends the life of your auger drive and excavator.
Troubleshooting Common Installation Issues
- Auger won’t spin: Check hydraulic couplers (loose/crossed), low hydraulic flow, or air in lines. Bleed air and verify flow/PSI match.
- Leaks at hydraulic couplers: Dirty couplers or worn seals—clean thoroughly or replace seals.
- Loose mounting pins: Worn cotter pins or undersized pins—replace with OEM-grade locking pins.
- Vibration/noise: Misaligned mount, ungreased pins, or bent auger bit—realign, grease, or replace the bit.
- Auger spins backward: Swap hydraulic hoses—simple fix, no damage done.
Conclusion
Attaching an auger drive to your excavator is straightforward when you follow safety, compatibility, and step-by-step best practices. With the right prep, tools, and a little help, you’ll convert your excavator into a multi-purpose drilling machine in under an hour. Always prioritize safety, double-check hydraulic connections, and use high-quality components for reliable performance. Now you’re ready to tackle post holes, piles, and landscaping projects with speed and precision—happy drilling!
Related News
- Planetary Gear Reducer Ratio Calculation & Load Capacity Explained
- Drilling Gearbox: Functions, Types, Key Features, Selection Guide, and Maintenance Tips
- The Core Power Transmission Pillar of Offshore Drilling Platforms
- Precision Machined Parts: The Unsung Backbone of Modern High-Performance Manufacturing
- Why Choose a Planetary Gear Reducer for High Torque?
- How to Choose the Right Centerless Grinder for Your Production Line
Leave me a message


")


